



On this pageWhat You Are Actually Looking At: The Inside of a Chimney in Layers9 sections+8
- What You Are Actually Looking At: The Inside of a Chimney in Layers
- Start at the Bottom: The Firebox, the Throat and the Damper
- The Smoke Shelf and Smoke Chamber: The Part Nobody Knows Exists
- Looking Inside a Chimney Yourself: A Ten Minute Flashlight Check
- The Flue Liner: What Sound and Failed Look Like
- The Black Stuff: Soot, Creosote, and the Three Degrees
- The Top: Flue Opening, Crown and Cap
- When Someone Needs to See the Inside of a Chimney With a Camera
- How VIO Helps You See the Inside of a Chimney
Quick answer
The inside of a chimney is the flue, a vertical passageway lined with a separate barrier such as clay tile, cast concrete, or stainless steel. Looking up from the firebox you meet the firebrick chamber, the throat, the damper, the smoke shelf, the sloped smoke chamber, then the liner running to the crown and cap at the top. Dark deposits are expected; texture matters more than colour, and what is visible from the hearth does not reveal the rest of the flue.
Kneel down on the hearth, point a phone light up past the firebox opening, and you will see almost nothing. A dark slot. Some soot. Maybe the edge of a metal plate. Almost everyone who wants to know what the inside of a chimney looks like starts exactly there, gets about three feet of answer, and gives up.
This article is the rest of the trip. We walk up the flue from the bottom, in the order you would physically meet each part, and every one of them gets two descriptions: what it looks like when it is sound, and what it looks like when it is not.
By the end you will have a name for anything your flashlight lands on, including the one part at the very top that most homeowners get wrong. Fair warning on that last one. It is not the part you are expecting.
What You Are Actually Looking At: The Inside of a Chimney in Layers
Before naming any part, understand this: a chimney is not one object. It is three things nested inside each other, and almost every confusion about the inside of a chimney comes from collapsing them into one.
The masonry shell
This is the part you can see from the street. Brick, stone, or concrete block, mortared together, running from the foundation up past the roofline.
It is structure, and not much else. Ordinary brick and standard mortar were never designed to take direct combustion gases for decades.
The liner, the layer people forget
Inside that shell sits a separate barrier called the flue liner, and this is the piece doing the actual safety work.
It protects the masonry from the acidic byproducts of combustion, it keeps flue gas from working its way through the wall into your living space, and on an oversized chimney it can bring the passageway down to a size the appliance can actually draw through.
In American houses it is usually one of three things. Clay flue tile, which is what most masonry chimneys were built with originally. Cast-in-place concrete, poured as one continuous tube. Or a stainless steel system, rigid or flexible, often wrapped in insulation.
Good to know: one chimney stack can contain more than one flue. A single brick column on the roof might carry a fireplace on one side and a furnace vent on the other, running parallel the whole way up and never touching. The flue you are peering up from the living room may not be the one an inspector was talking about.
The flue itself
The flue is the empty vertical passageway running through the middle of all that. Everything else exists to shape it and protect it.
So when someone says they want to see the inside of a chimney, what they mean is the flue and the surfaces facing it. That is what the rest of this article walks through.
Start at the Bottom: The Firebox, the Throat and the Damper
Now we climb.
The firebox and its firebrick
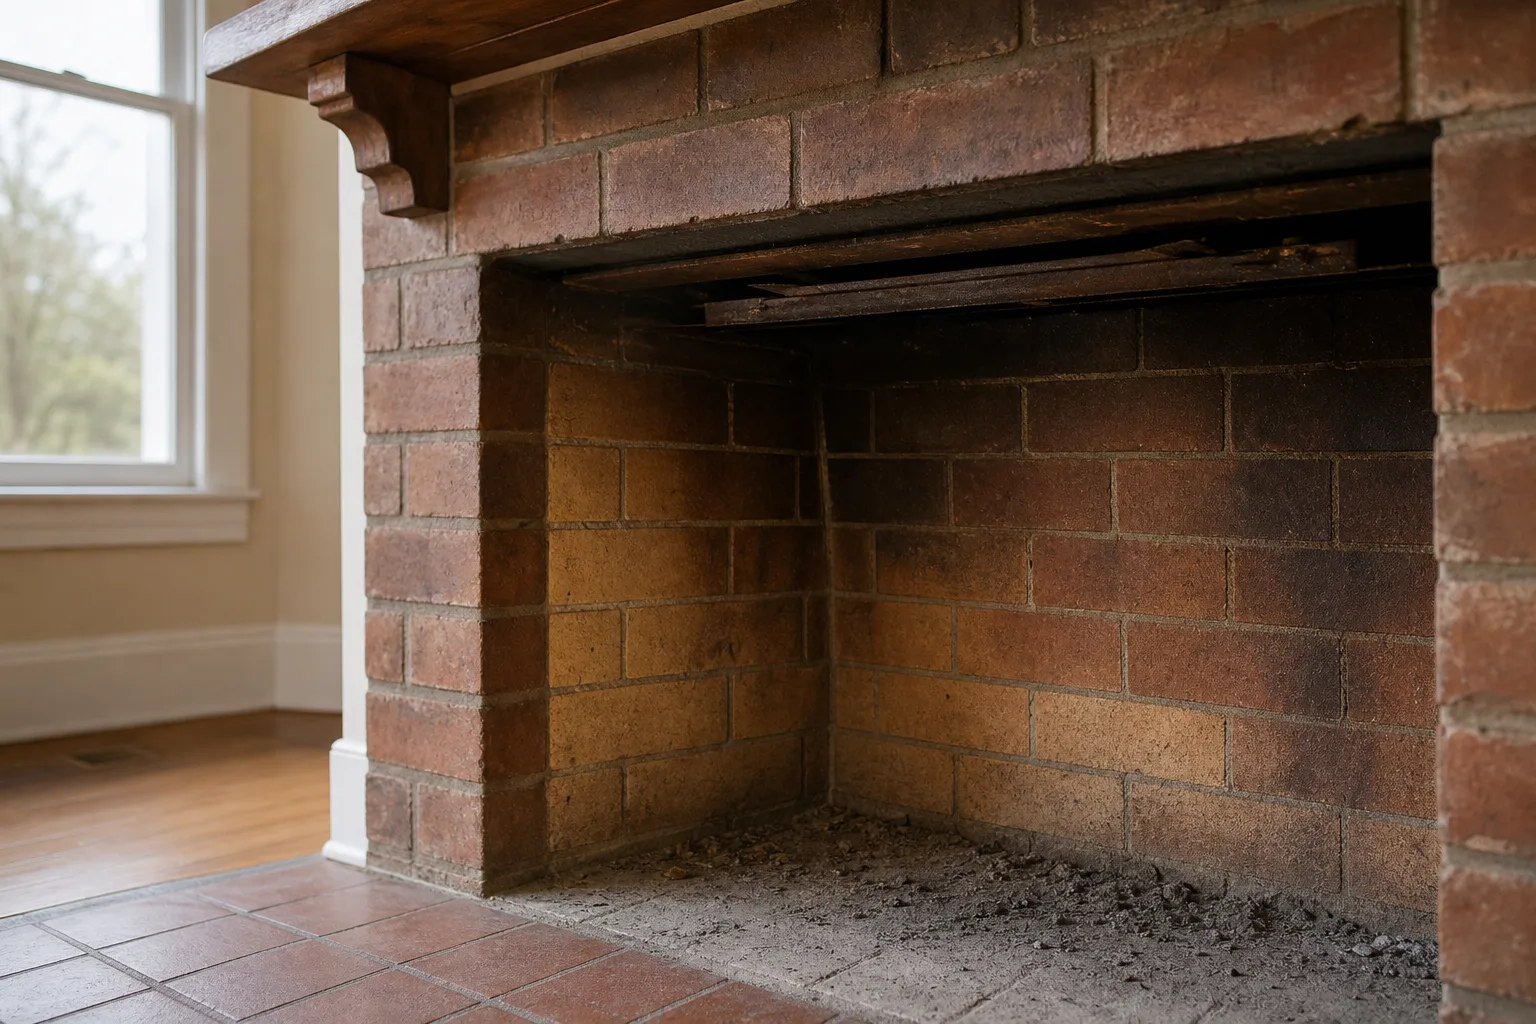
The firebox is the chamber the fire sits in, and it is built differently from everything around it. The brick lining it is firebrick, laid in thin joints of refractory mortar, because it has to take repeated direct flame where ordinary brick would crack and flake apart.
Sound firebrick looks tan, buff, or deep red where it is clean, with tight joints and a back wall that usually slopes forward to push heat into the room. The floor is brick under a layer of ash.
Failed firebrick announces itself: cracks across the face of individual bricks, joints crumbled out to gaps you could fit a finger into, whole faces spalled off in flakes. In a prefabricated fireplace the equivalent is the refractory panel, and a cracked panel is a real finding, not a cosmetic one.
Safety note: cold firebox only. Not the morning after a fire, not while anything is smoldering. Masonry holds heat far longer than it looks like it should, and a chimney can still vent carbon monoxide from embers you cannot see. A working CO alarm is not optional regardless of what you find up there.
The throat and the damper
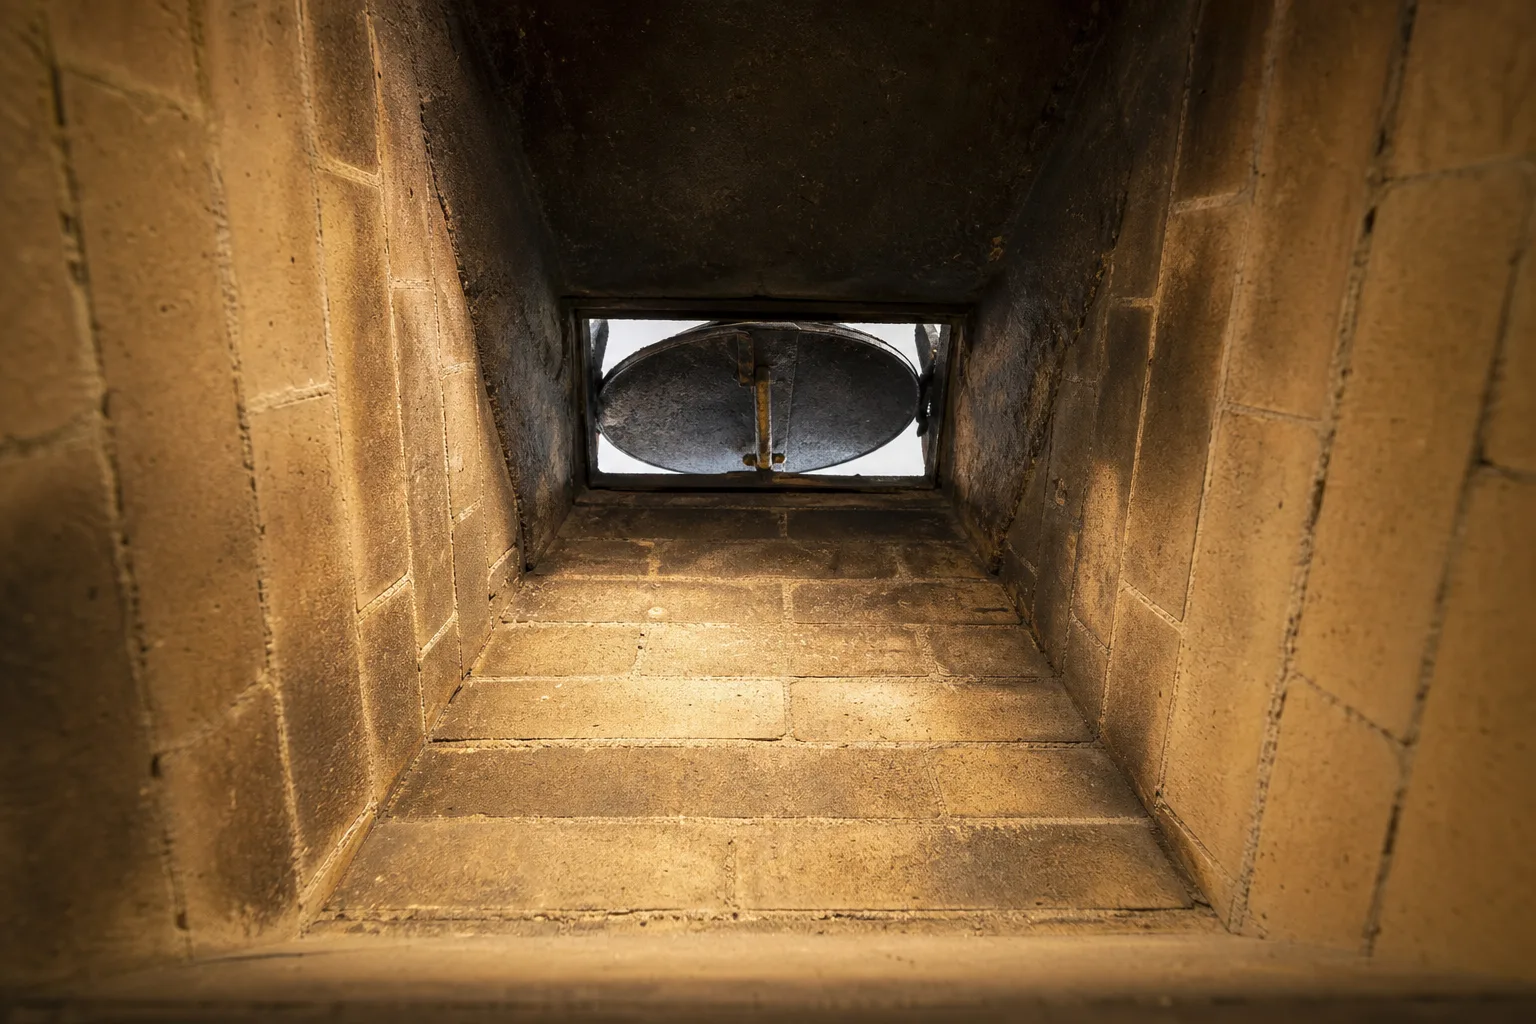
Directly above the firebox the opening pinches down into a narrow horizontal slot. That is the throat.
Sitting in it is the damper: a metal plate, usually cast iron or steel, that swings or slides open. Open while you are burning, closed when you are not.
The first thing to check is whether it moves. It will be dark and grimy, because everything above the fire line is dark and grimy, but the handle should shift it and it should sit flat when closed. Movement on its own does not tell you the damper is sound or sealing correctly, only that it is not seized.
A clearly bad one is rusted solid, or warped so it no longer closes flat, or missing a piece. If yours will not budge, stop pulling on it. People break them off this way.
The Smoke Shelf and Smoke Chamber: The Part Nobody Knows Exists
Above the damper the chimney does something clever that almost nobody who owns one has heard of.
The smoke shelf, designed to be dirty
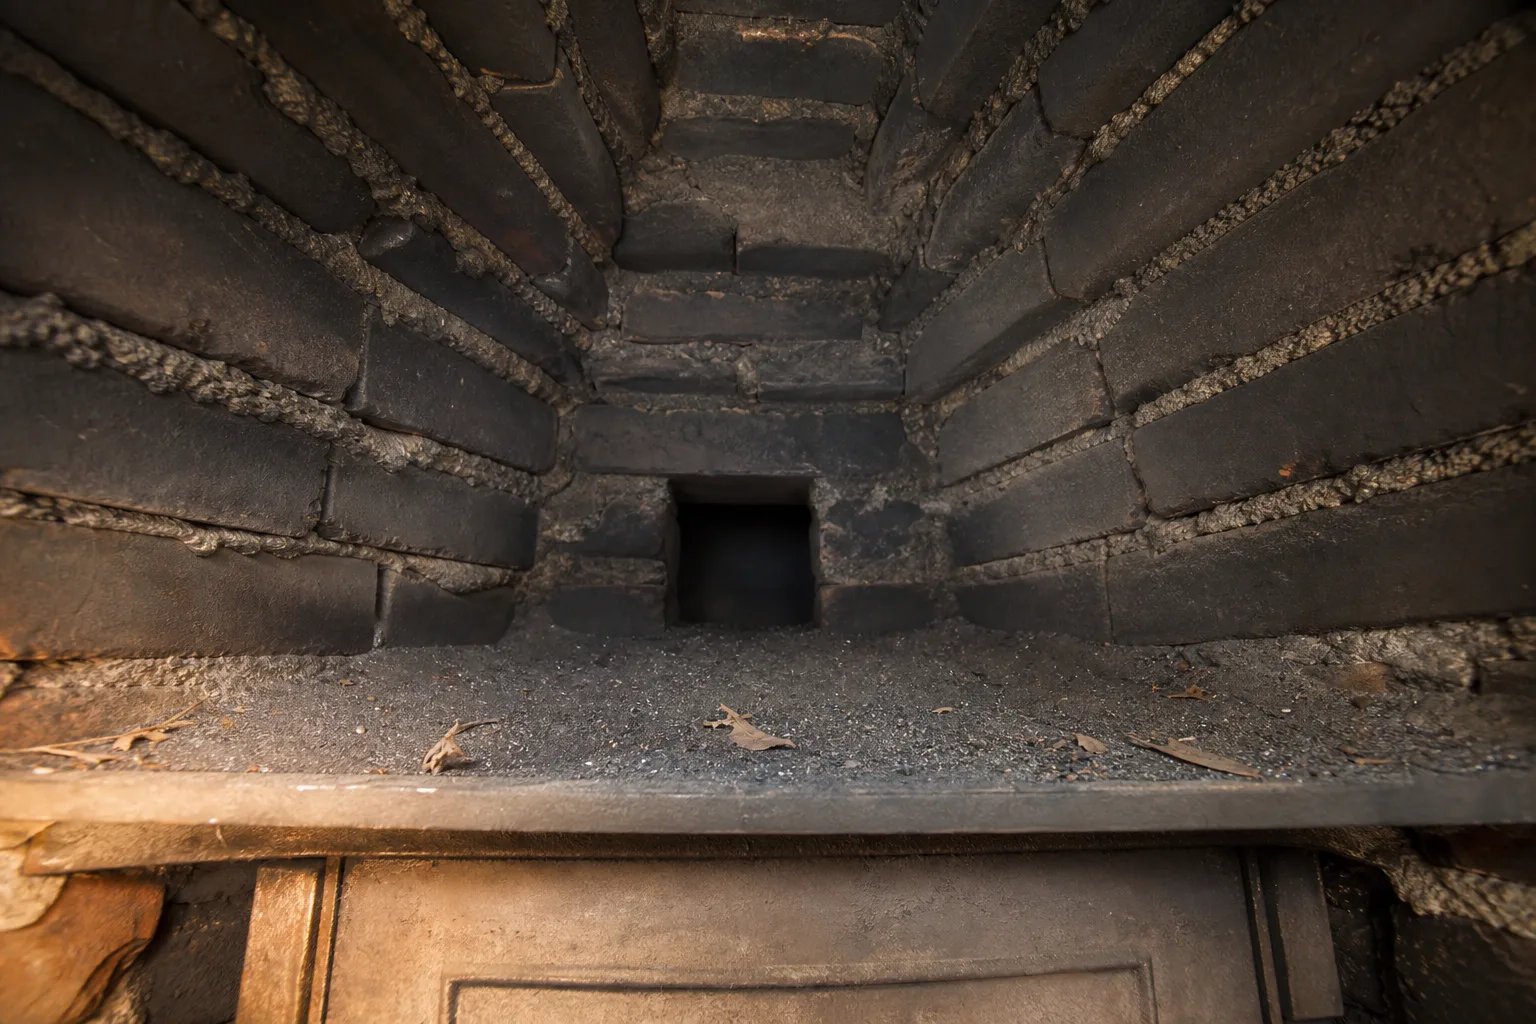
Just behind the damper there is a flat horizontal ledge. That is the smoke shelf, and it is not an accident of construction.
Cold air coming down the flue hits that shelf and gets turned back upward instead of shoving your fire's smoke out into the living room. A downdraft catcher made of nothing but geometry.
It will be covered in soot, and it will very likely have mortar crumbs, leaf litter, or bird debris sitting on it, because it catches those too.
From the field: of everything in a fireplace system, the smoke shelf is the part homeowners are most surprised to learn exists at all. They find the debris on it and assume the chimney has been badly neglected. Often the shelf is doing exactly the job it was built to do.
The smoke chamber and why parging matters
Above the shelf, the walls angle inward. The smoke chamber is the tapered, funnel-shaped space that takes the full width of the firebox and squeezes it down to the much smaller flue opening.
The slope is what makes smoke compress and accelerate upward instead of tumbling and stalling.
Which is why the surface matters. A smoke chamber should be parged, meaning coated smooth with refractory mortar, so those sloped walls run continuous. What you often find instead in older houses is raw corbelled brick, stair-stepped inward with mortar squeezed out of every joint, sooted black.
Every one of those steps is a ledge for smoke to catch on and creosote to collect on. It is a common reason a fireplace smokes into a room for no apparent reason.
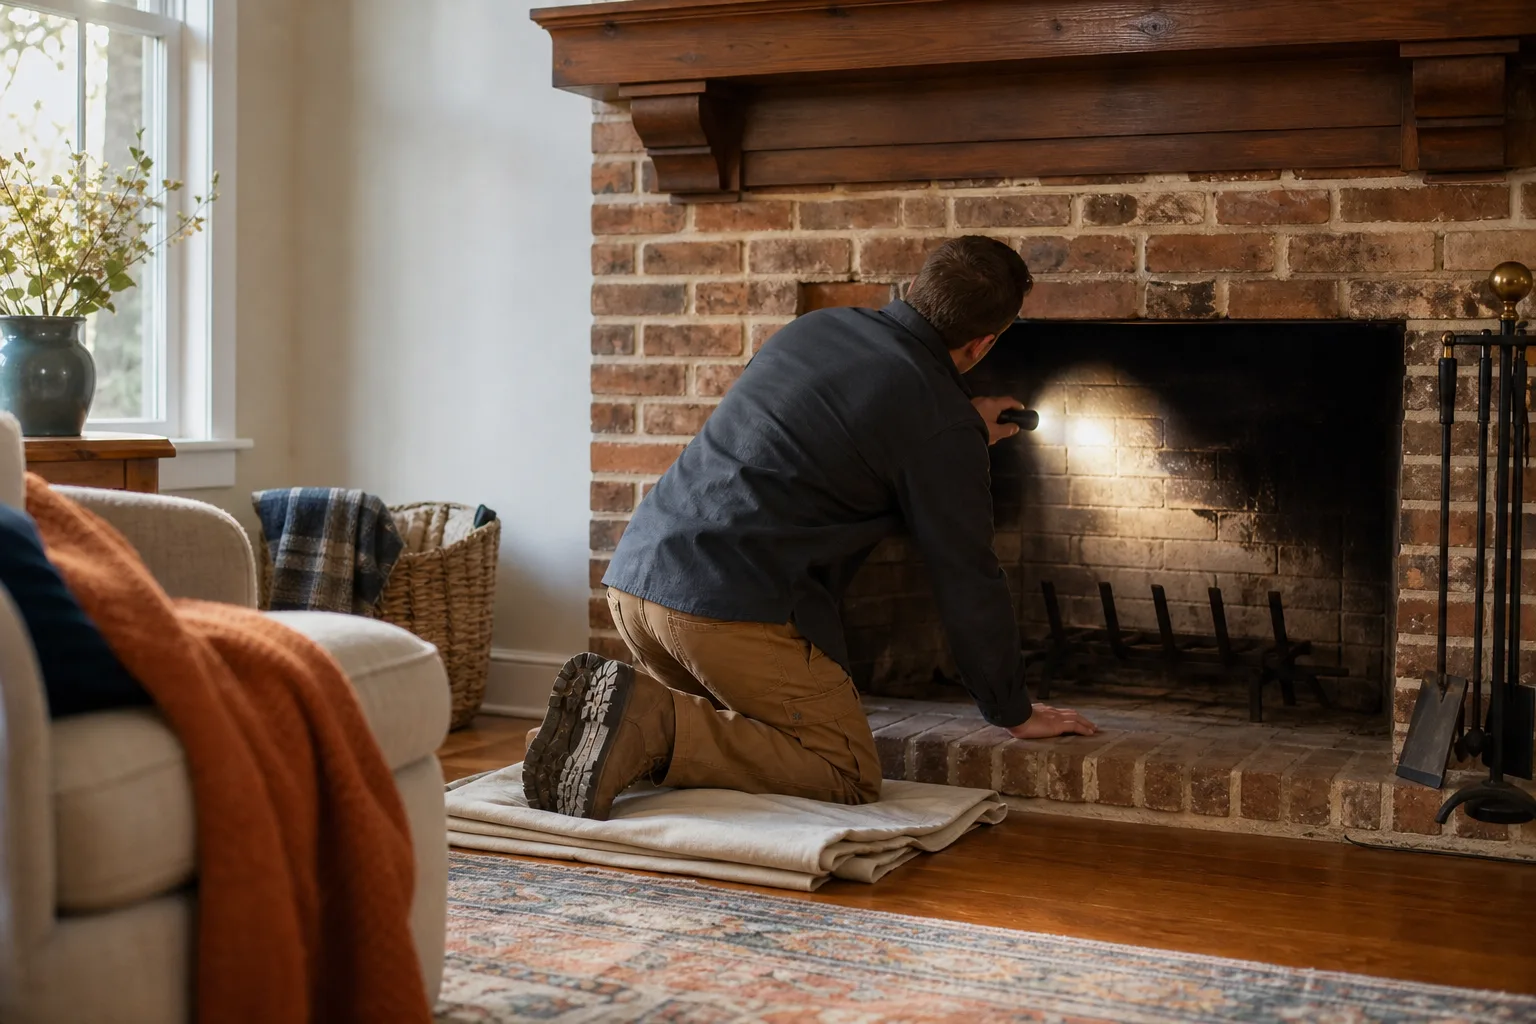
Looking Inside a Chimney Yourself: A Ten Minute Flashlight Check
You can do more than you think from the hearth. You also cannot do nearly as much as you would like, and knowing exactly where that line falls is worth more than any single thing you will see.
What you need and when to do it
A bright flashlight, not a phone screen. A small mirror if you have one. Eye protection, because you are about to look straight up at something that sheds. Cold firebox, and daylight helps, since you can sometimes see sky at the top.
What you can see, step by step
- Clear the grate and the ash pile out of the way.
- Open the damper fully. If you cannot find the handle, look for a lever or a rotary crank just inside the top of the opening.
- Kneel to the side of the firebox opening rather than under it, and angle the light upward.
- Look at the firebrick first: faces, joints, back wall, floor.
- Find the damper plate and check that it moves and seats.
- Look behind and above it for the smoke shelf and the sloped smoke chamber walls.
- Send the light as far up the flue as it reaches, and note the color and texture of what you see.
- Check the cleanout door if you have one, usually a small cast iron door at the base of the stack, for fallen material.
Pro tip: angle the beam instead of shining it straight up, and keep your face out from under the opening. Soot comes down when you disturb a damper that has not moved since last winter. The mirror works better than craning your neck, and it keeps your eyes out of the drop zone.
Where your eyes stop
Here is the honest part.
From the hearth you can get a decent look at the firebox and the damper, and a partial look at the smoke shelf and smoke chamber. That is a homeowner's glance, not an inspection in the NFPA 211 sense, and it cannot establish the condition of the system. Above that you are looking up a narrow dark tube at a steep angle, getting maybe the first few feet of liner.
A masonry chimney runs the height of the house and then some. Most of the inside of a chimney sits above the point where a flashlight beam becomes useless, and standing on the roof looking down does not solve it either. The flue is too long, too dark, and too narrow.
That is not a failure of effort. It is a physical limit, and it is the entire reason camera inspections exist.
See the rest of it, not just the first three feet
A flashlight shows you the firebox, the damper and the smoke shelf. The flue above that is the part nobody can check from the hearth. Tell us what you found and where you are, and VIO connects you with an independent chimney company near you that can put a camera up it. Being matched puts you under no obligation, and you decide whether to go ahead.
Call (513) 655-6702 or request service online.
The Flue Liner: What Sound and Failed Look Like
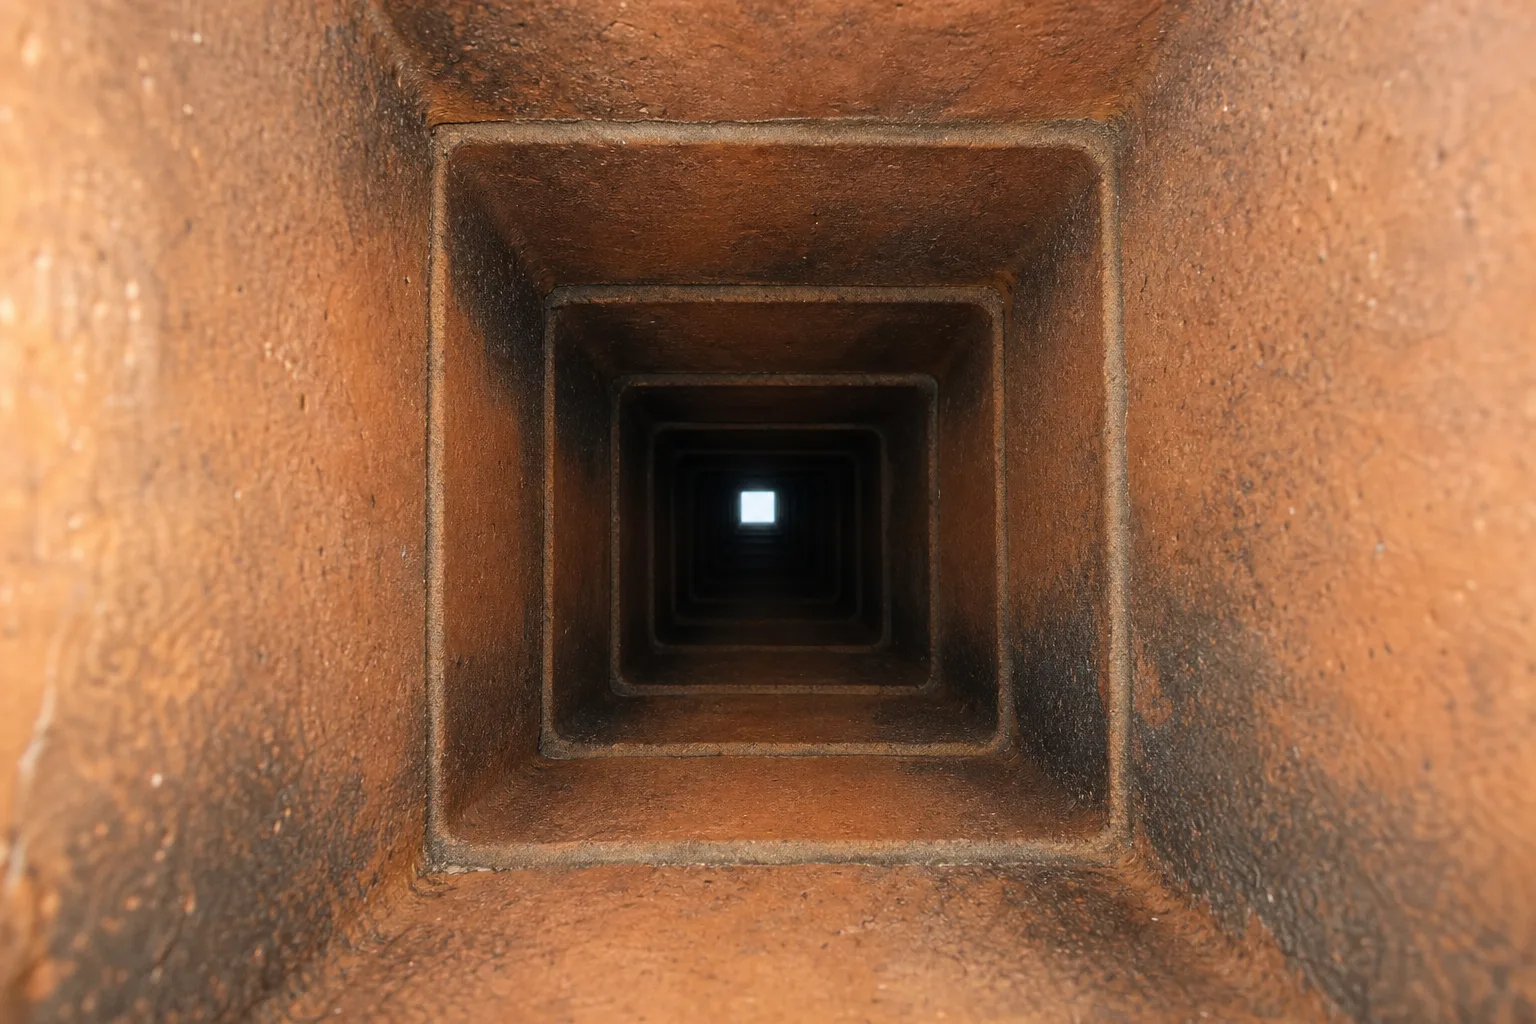
For most of the height of the inside of a chimney, the liner is the only surface you are looking at. It is also the component most likely to be quietly wrong.
Clay flue tile
Sound clay tile reads from directly below as a square tunnel receding into the dark. Orange-brown terracotta where it is clean, with a horizontal mortar joint every couple of feet where one tile stacks on the next.
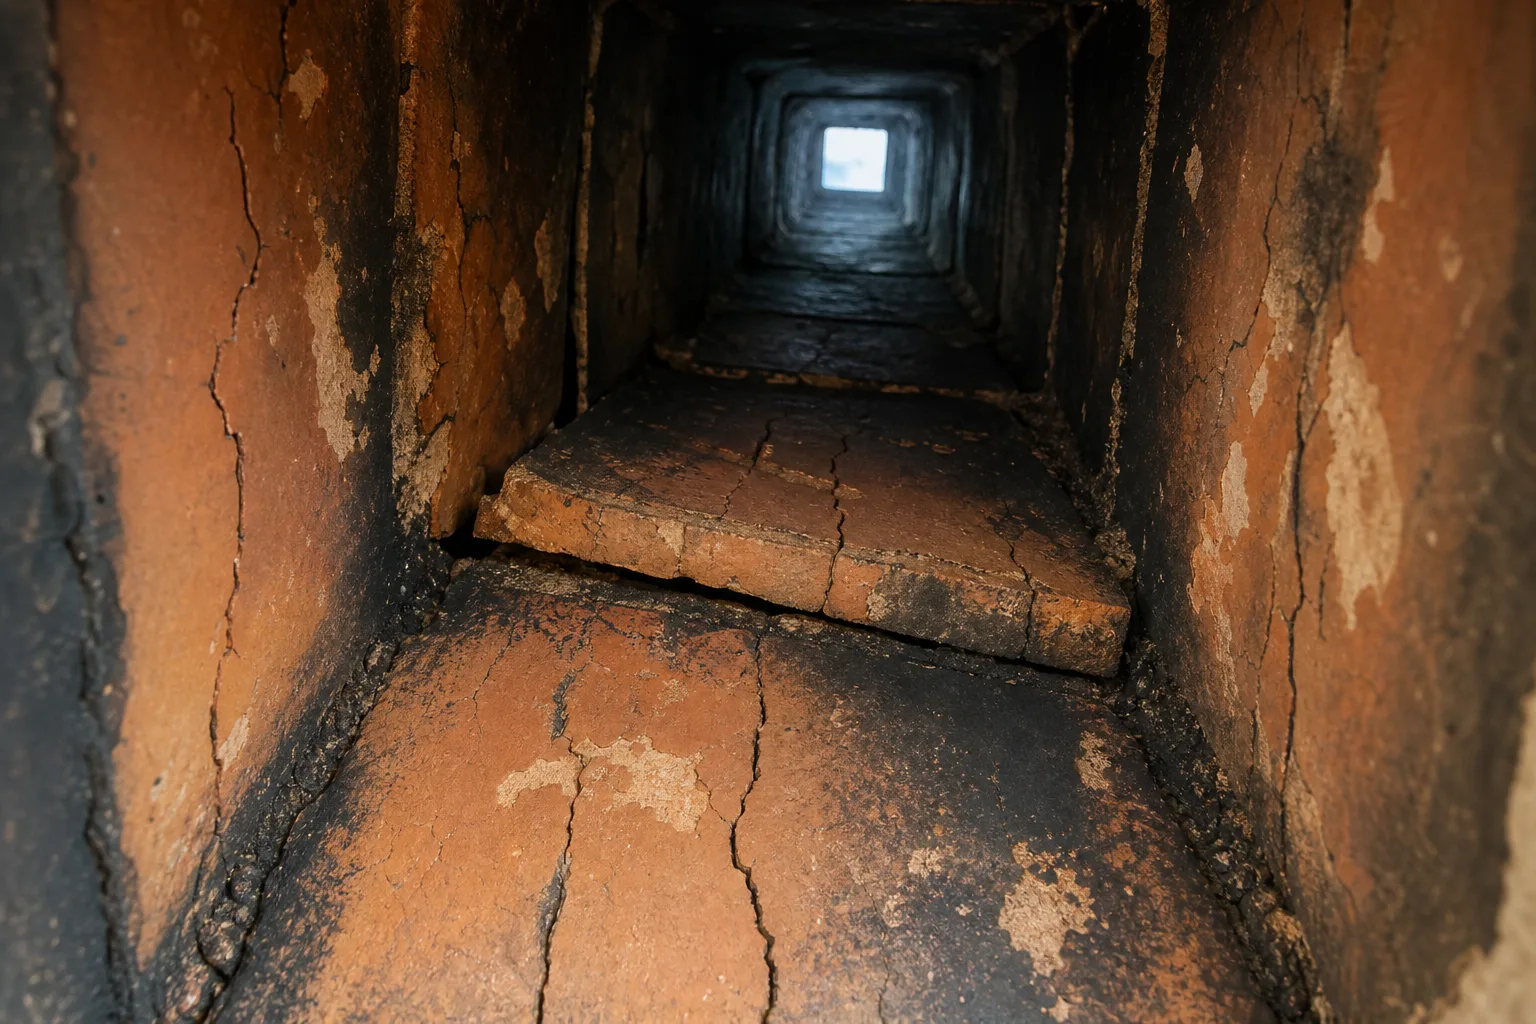
Failed clay tile shows cracks across the tile face, flakes spalled off the surface, joints washed out into dark open gaps, or a tile shifted out of line with the one below it.
It fails from heat stress: the tile expands faster than the masonry around it, cracks, and stays cracked. None of that is visible from your living room or your driveway.
Stainless steel liners
A stainless liner looks completely different: a round, dull silver tube, smooth-walled or corrugated, running the height of the flue, often with insulation packed into the space between it and the old masonry.
Up at the crown you would see a top plate and a clamp holding it. Sound stainless is uniform and intact. Failed stainless shows corrosion staining, crushed or separated sections, or a top plate that has pulled loose.
Why a cracked tile hides
A crack in a flue tile is on the inside face of a liner that sits inside a masonry shell. From the roof you see the top of the stack. From the firebox you see a few feet. From outside you see brick.
There is no angle from which a person standing on their own property can see a cracked tile forty feet up. That is not a scare tactic, it is geometry.
Myth vs. fact: the myth is that if the smoke goes up and the room stays clear, the chimney must be fine. The fact is that draft and condition are separate things. A flue with a cracked liner can draw beautifully right up until the day the crack matters. Good venting tells you about airflow, not about the barrier around it.
The Black Stuff: Soot, Creosote, and the Three Degrees
Some darkness inside of a chimney is expected. What is harder to read is what kind of darkness you are looking at, and colour alone will not settle it: hazardous creosote can be black, and so can ordinary soot.
Texture and finish carry more information than shade does, which is why the classification below is worth knowing. Keep in mind throughout that whatever you can see from the hearth says nothing about the rest of the flue above it.
Soot is the fine, dusty carbon residue that fire leaves on everything. Creosote is the condensed, combustible byproduct of wood smoke, and the Chimney Safety Institute of America classifies it into three degrees by severity. Telling them apart by sight is genuinely useful.
| Degree | What it looks like | What it means for cleaning |
|---|---|---|
| First | Matte, dusty, flaky, soft. Dark gray to black. A brush leaves a clean streak. | Comes off with standard chimney brushing. |
| Second | Hard, shiny black flakes, porous, like dark hardened tar cornflakes. | Brushing is not enough. Rotary systems or chemical treatment are typically required. |
| Third | Dense, glossy, wet-looking black glaze, smooth and continuous, like poured tar that set in place. Reflects a flashlight beam. | Bonded tightly to the flue. Does not respond to mechanical brushing alone. Highly flammable. |
First degree: flaky and dusty
If what your light finds is matte and powdery and dark, that is the ordinary result of burning wood, and it comes off with routine brushing. What it does not tell you is what is sitting further up, where deposits can be heavier, a blockage can form, or the liner can be damaged. Seeing first degree deposits at the bottom rules nothing out above.
Second degree: shiny black flakes
The shift from matte to shiny is the one visual change worth learning. Second degree creosote has a hard, glassy look to individual flakes, and usually there is more of it.
It signals that something in the burn is off: wet wood, a restricted air supply, an oversized flue, or flue gas cooling too fast on the way up.
Third degree: the glaze
Third degree is unmistakable once you know it. A thick, gleaming, tar-like coating that looks wet and is not, covering the tile in a continuous skin. It can build up enough to noticeably narrow the flue opening.
This is the dangerous one, and a brush will simply slide over it.
The Top: Flue Opening, Crown and Cap
Everything so far has been the inside of a chimney seen from below. The top of the stack is where the part most people get wrong lives.
Here it is. The crown and the cap are two different things, and the crown is the one that matters more.
The cap is the lid: galvanized or stainless, sitting on short legs over the flue opening with mesh screen sides, keeping rain, leaves, squirrels and birds out.
The crown is the sloped concrete or mortar slab forming the finished top of the masonry, with the flue tile protruding a few inches above it. Its job is to shed water off the brickwork and away from the joint where the liner meets the shell.
When a crown cracks, and older ones very often do, water runs straight down into the space between the liner and the masonry.
Good to know: water, not fire, does most of the quiet damage to a chimney. It soaks into mortar, freezes, expands, and pushes joints apart from the inside over repeated winters. A cracked crown is a small visible problem sitting directly on top of a large invisible one.
When Someone Needs to See the Inside of a Chimney With a Camera
At some point the answer stops being a flashlight. NFPA 211, the US standard covering chimneys, fireplaces and vents, sorts inspections into three levels.
A Level 1 inspection is the annual baseline, covering the readily accessible portions of the chimney inside and out, plus the accessible portions of the appliance and its connection.
A Level 2 goes further and includes video scanning of the flue interior. It is required at the sale or transfer of a property, when the appliance or fuel type changes, after a chimney fire, after a malfunction, and after an external event such as severe weather or an earthquake.
A Level 3 is reserved for suspected serious structural damage, and it can involve removing portions of the chimney or the surrounding structure to reach what is hidden.
If any item on that Level 2 list describes your situation, the standard has effectively made the decision for you.
What a Camera Inspection of the Inside of a Chimney Shows
A camera on a flexible push rod goes up from the firebox, or down from the top, and sends back a continuous picture of the flue wall the whole way.
That picture catches the cracked tile at the thirty foot mark, the offset joint, the internal spalling, the gap where mortar used to be, and the glaze you could not see past the first bend. It is the only practical way to see the whole inside of a chimney rather than the opening of one.
If that is where you have landed, you can tell us what you are seeing and get matched with a local company that does camera inspections.
How VIO Helps You See the Inside of a Chimney
VIO is a referral service, and it is worth being clear about what that means. VIO does not sweep chimneys and does not run cameras. We connect homeowners with independent local chimney companies that do.
For your situation it works like this. You tell us what you are seeing and roughly where you are, we match you with a company in your area that handles camera inspections and the work that might follow, and that company deals with you directly from there.
Being matched commits you to nothing. You decide whether to go ahead with the company we point you to, and any charges are set and quoted by that company, not by us.
On money, one thing worth saying plainly: we ask every company in the network to put its estimate in writing before any work starts, and you should insist on exactly that. Get the scope and the number on paper before anyone touches your chimney.
If you have read this far, you know more about the inside of a chimney than most people ever bother to learn. You can name the firebox, the throat, the damper, the smoke shelf, the smoke chamber, the liner, the crown and the cap, and you can tell soot from creosote and first degree from third. The only question left is what the forty feet you cannot see look like, and answering that takes a camera.
Find out what is actually inside your chimney
You have a name for every part now. The next step is someone with a camera confirming which of them are sound. Tell VIO what you are seeing and we match you with an independent chimney company in your area. No obligation, and you choose whether to go ahead.
Call (513) 655-6702 or request service.
Symptom checker
What is your chimney doing?
Tap the closest match for an honest first answer.